C++ on macOS
Install the SmartSpectra C++ SDK and run the SwiftUI macOS sample app.
SmartSpectra C++ Quickstart — macOS
Supported Platforms
| Platform | Status | Notes |
|---|---|---|
| macOS Apple Silicon (14.0+) | Supported | Homebrew package available |
| macOS Intel | Not supported | — |
For platforms not listed above, contact support@presagetech.com if you have a specific need.
Installation
Prerequisites
- Xcode with Command Line Tools (provides a C++17 toolchain and the Swift compiler)
- Homebrew
- API key from physiology.presagetech.com
- Apple Development signing identity — required for SDK startup on macOS
Install Xcode Command Line Tools if you do not have them:
xcode-select --installAdd the SDK
The Homebrew formula installs the self-contained SmartSpectra SDK and exposes its CMake package metadata. You do not need to install OpenCV, protobuf, or other SDK runtime libraries separately — the formula declares them as dependencies and Homebrew installs them automatically.
brew tap presage/smartspectra https://github.com/Presage-Security/homebrew-smartspectra
brew install presage/smartspectra/smartspectra
For the release-candidate channel, install smartspectra-rc instead:
brew unlink smartspectra
brew install presage/smartspectra/smartspectra-rc
Verify the install
After Homebrew finishes, confirm the SDK is wired up before opening Xcode:
pkg-config --modversion SmartSpectra
ls /opt/homebrew/lib/cmake/SmartSpectra
pkg-config should print the installed SDK version. The ls should list
the SmartSpectra CMake config directory the formula installed (this is
what find_package(SmartSpectra CONFIG REQUIRED) in your own CMake project
will pick up — see "Installed Paths" below). If either fails, re-run
brew install and check brew doctor.
Permissions
SmartSpectra's default macOS builds require a signed host app with the keychain entitlements needed for the SDK. This applies to SDK startup in general, including file-based processing.
The SwiftUI sample below ships with the required entitlements already
configured. For your own integrations, mirror the sample's
smartspectra_swift_ui.entitlements file
(stable
| rc).
Example
The recommended starting point is the SmartSpectra SwiftUI macOS sample, a native SwiftUI app that opens directly in Xcode and links against the Homebrew-installed SDK. It demonstrates camera capture, validation status, breathing/cardio metrics, and trend traces end to end.
Source:
Result you should get
At the end, the sample app should show:
- live camera preview
- validation and processing status
- breathing and cardio metric cards
- waveform or trend traces for supported metrics
- a start/stop control for processing
Clone and verify the environment
Match the branch to the Homebrew formula you installed: main for the
stable smartspectra formula, rc for the smartspectra-rc formula.
Stable:
git clone --branch main https://github.com/Presage-Security/SmartSpectra.git
cd SmartSpectra/cpp/samples/macos_swiftui_example
./scripts/check-requirements.sh
Release candidate:
git clone --branch rc https://github.com/Presage-Security/SmartSpectra.git
cd SmartSpectra/cpp/samples/macos_swiftui_example
./scripts/check-requirements.sh
The script checks the Homebrew SDK, required model files, Vulkan/MoltenVK setup, the SDK graph asset path, and code-signing visibility. To apply safe runtime fixes (install missing Homebrew packages), run:
./scripts/check-requirements.sh --fixOpen in Xcode
From cpp/samples/macos_swiftui_example, open the Xcode project with:
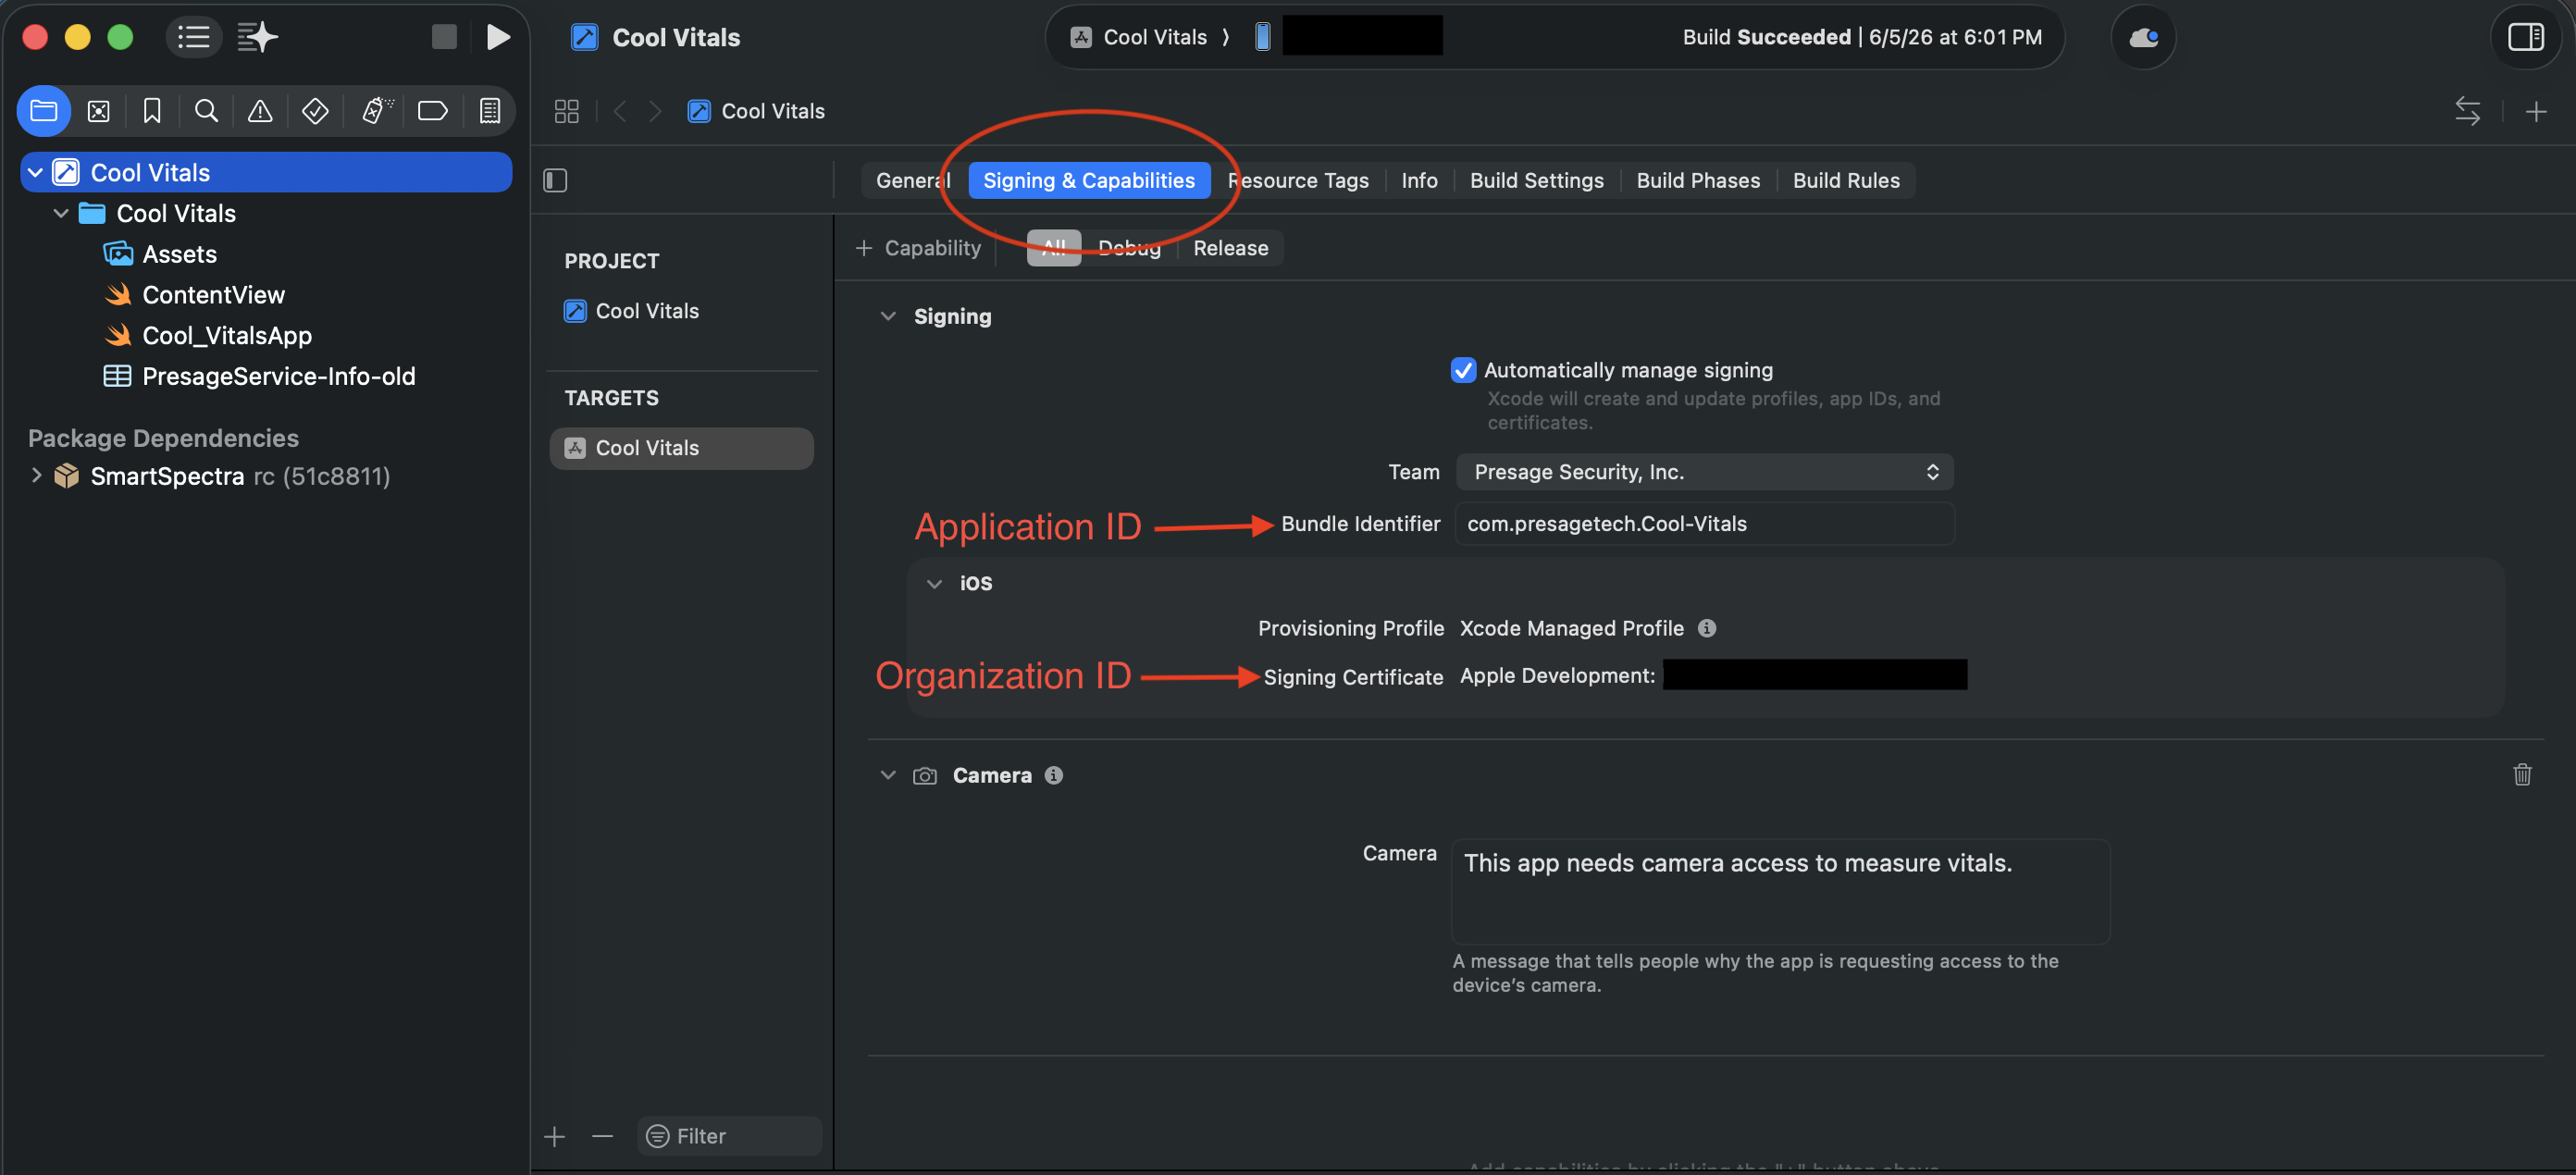
open smartspectra_swift_ui.xcodeprojThen select the smartspectra_swift_ui scheme and configure signing on the
app target under Signing & Capabilities:
Team             = your Apple Development team
Bundle Identifier = a unique identifier for your machine or organization
After selecting the app target, this is the Xcode area you should use:
To find your Team ID, open Xcode > Settings > Accounts, select your Apple ID
and team, and read the Team ID value. From the terminal:
security find-identity -v -p codesigningThe 10-character ID in parentheses at the end of an Apple Development
identity is your Team ID.
Press Run. Enter your SMARTSPECTRA_API_KEY in the app and press Start.
On first launch, allow camera access when macOS prompts.
What success looks like
When your program is running, you should see all of these:
- the sample launches from Xcode without missing SDK or model-file errors
- macOS prompts for camera access on first launch
- the camera preview appears after you allow camera access
- processing starts after you enter a valid API key and press Start
- metric cards and traces update while you remain centered and well-lit
Expected API key check
The first measurement should start after camera permission is granted and the API key is submitted. If startup fails with an authentication error, verify that the API key is valid and authorized for this app.
Common manual mistakes
If the screen does not match the target state, check these first:
- the Homebrew formula channel does not match the sample branch
HOMEBREW_PREFIXorSMARTSPECTRA_SDK_ROOTpoints at the wrong SDK install- the app target is not signed with an Apple Development identity
- camera permission was denied in macOS System Settings
- the API key was mistyped or copied with extra whitespace
- the app is still running an older build from Xcode
brew install presage/smartspectra/smartspectra-rc fails because smartspectra is already linked
If you installed the stable formula first, Homebrew may require the stable formula to be unlinked before it links the RC formula:
brew unlink smartspectra
brew install presage/smartspectra/smartspectra-rc
Configuration
If your Homebrew prefix is not /opt/homebrew, open the project's Build
Settings and set:
HOMEBREW_PREFIX       = output of `brew --prefix`
SMARTSPECTRA_SDK_ROOT = $(HOMEBREW_PREFIX)
The project derives include and library paths from those two variables. The
Validate Setup build phase checks the SDK header, library, interface
headers, and OpenCV headers before compilation, so a wrong prefix surfaces
early.
Additional Details
Portable hello_vitals example
This example also lives in smartspectra/cpp/samples/hello_vitals/.
hello_vitals.cpp:
#include <smartspectra/messages/metrics.h>
#include <smartspectra/smartspectra.h>
#include <smartspectra/smartspectra_config.h>

#include <chrono>
#include <csignal>
#include <cstdlib>
#include <iostream>
#include <string>
#include <thread>

namespace spectra = presage::smartspectra;

namespace {

volatile std::sig_atomic_t g_stop_requested = 0;

void HandleSignal(int) {
    g_stop_requested = 1;
}

std::string ResolveApiKey(int argc, char** argv) {
    if (argc > 1) {
        return argv[1];
    }
    if (const char* key = std::getenv("SMARTSPECTRA_API_KEY")) {
        return key;
    }
    return {};
}

}  // namespace

int main(int argc, char** argv) {
    std::signal(SIGINT, HandleSignal);
    const std::string api_key = ResolveApiKey(argc, argv);
    if (api_key.empty()) {
#if defined(_WIN32)
        std::cerr << "Usage: .\\hello_vitals.exe YOUR_API_KEY\n"
                  << "or set SMARTSPECTRA_API_KEY=YOUR_API_KEY\n";
#else
        std::cerr << "Usage: ./hello_vitals YOUR_API_KEY\n"
                  << "or export SMARTSPECTRA_API_KEY=YOUR_API_KEY\n";
#endif
        return 1;
    }

    spectra::SmartSpectraConfig config;
    config.api_key = api_key;
    config.requested_metrics = spectra::SmartSpectraConfig::BreathingMetrics();
    config.AddMetrics(spectra::SmartSpectraConfig::CardioMetrics());

    spectra::SmartSpectra sdk(config);
    sdk.SetOnMetrics([](const spectra::Metrics& metrics, int64_t) {
        if (metrics.has_cardio()) {
            std::cerr << "Cardio metrics: "
                      << metrics.cardio().ShortDebugString() << "\n";
        }
        if (metrics.has_breathing()) {
            std::cerr << "Breathing metrics: "
                      << metrics.breathing().ShortDebugString() << "\n";
        }
    });
    sdk.SetOnValidationStatusChanged(
        [have_last_status = false,
         last_code = spectra::ValidationCode::kOk,
         last_hint = std::string{}](const spectra::ValidationStatus& status, int64_t) mutable {
            if (have_last_status &&
                status.code == last_code &&
                status.hint == last_hint) {
                return;
            }
            have_last_status = true;
            last_code = status.code;
            last_hint = status.hint;
            std::cerr << "Validation [" << status.code
                      << "]: " << status.hint << "\n";
        });
    sdk.SetOnError([](const spectra::SmartSpectraError& error) {
        std::cerr << "Error [" << static_cast<int>(error.code)
                  << "]: " << error.message << "\n";
    });

    const auto source_error =
        sdk.UseCamera().SetResolution(1280, 720).SetFps(30).Build();
    if (!source_error.ok()) {
        std::cerr << "Failed to create camera source: "
                  << source_error.message << "\n";
        return 1;
    }

    if (const auto err = sdk.Start(); !err.ok()) {
        std::cerr << "Failed to start: " << err.message << "\n";
        return 1;
    }

    std::cout << "Processing... Press Ctrl+C to stop.\n";
    while (!g_stop_requested) {
        std::this_thread::sleep_for(std::chrono::milliseconds(200));
    }
    if (const auto err = sdk.Stop(); !err.ok()) {
        std::cerr << "Stop failed: " << err.message << "\n";
    }
    return 0;
}
The accompanying standalone project files are in that folder. To run the binary
end to end on macOS, wrap and sign it using the app-style flow in
smartspectra/cpp/samples/README.md#macos-signing, or use the SwiftUI sample
above.
Installed Paths
On Apple Silicon Homebrew installs, the default paths are:
- Headers:
/opt/homebrew/include/smartspectra/ - Libraries:
/opt/homebrew/lib/ - CMake config:
/opt/homebrew/lib/cmake/SmartSpectra/ - pkg-config:
/opt/homebrew/lib/pkgconfig/SmartSpectra.pc
Consumer code includes SmartSpectra headers as:
#include <smartspectra/smartspectra.h>
#include <smartspectra/smartspectra_config.h>
#include <smartspectra/messages/metrics.h>
When linking from your own CMake project:
find_package(SmartSpectra CONFIG REQUIRED)
target_link_libraries(my_app PRIVATE SmartSpectra::SDK)
Release-Candidate Builds
Release-candidate builds are published as a separate Homebrew formula,
smartspectra-rc, served by the same tap as the stable formula. Stable users
see no change; RC opt-in is additive.
brew install presage/smartspectra/smartspectra-rcRelease candidates do not automatically migrate to the stable formula. After a
stable release ships, uninstall smartspectra-rc and install smartspectra
to return to the stable channel:
brew uninstall presage/smartspectra/smartspectra-rc
brew install presage/smartspectra/smartspectra
Distributing an app that embeds the SDK (signing & notarization)
If you ship a macOS app that bundles libsmartspectra.dylib to other Macs,
Apple notarization
will reject the submission unless every embedded Mach-O is signed with your
Developer ID, has the
hardened runtime
enabled, and carries a secure timestamp.
The Homebrew-installed SDK does not satisfy this on its own. The formula
ships libsmartspectra.dylib ad-hoc signed (no Developer ID, no team
identifier, no secure timestamp), because Homebrew rewrites the library's
install names on install and re-signs it ad-hoc. So you must (re-)sign the
copy you embed in your app bundle — you cannot rely on the signature it has
when Homebrew installs it.
Re-sign the embedded library with your own identity
The embedded copy must be signed with the same identity as your app, for two reasons: notarization requires a Developer ID signature with a secure timestamp, and macOS library validation (in force once the hardened runtime is enabled) refuses to load a dylib whose Team ID differs from the host app's. Re-signing the copy you bundle satisfies both. (If you must keep a differently-signed copy instead, the host app needs the Disable Library Validation entitlement, which weakens its security posture and is not recommended.)
Xcode (recommended). Add libsmartspectra.dylib to your target under
Frameworks, Libraries, and Embedded Content and set it to Embed & Sign
(not "Embed Without Signing"). Xcode then re-signs the embedded copy with your
team's identity, hardened runtime, and a secure timestamp on each build.
Command-line / non-Xcode builds. Re-sign the bundled copy yourself, as the
last step before signing the app (any install_name_tool edit invalidates a
signature, so sign last):
codesign --force --options runtime --timestamp \
  --sign "Developer ID Application: <Your Org> (<TEAMID>)" \
  "<YourApp>.app/Contents/Frameworks/libsmartspectra.dylib"
Then sign the app itself with the same identity and --options runtime, submit
with xcrun notarytool submit --wait, and xcrun stapler staple the result.
See Apple's
Customizing the notarization workflow
for the full notarytool/stapler flow.
Make the bundle self-contained first
The Homebrew library records absolute load paths
(/opt/homebrew/opt/smartspectra/lib/...) and links its OpenCV, Vulkan loader,
and MoltenVK dependencies by absolute /opt/homebrew/opt/... paths — those
won't exist on a customer's Mac. Before signing, copy libsmartspectra.dylib
and its Homebrew dependency tree into Contents/Frameworks, rewrite the
install names to @rpath, and add an @executable_path/../Frameworks rpath to
your executable. A tool such as
dylibbundler automates the copy
and relocation; re-sign every relocated Mach-O afterward as shown above.
Note: the brew-installed library is not subject to Gatekeeper itself — Homebrew downloads are not quarantined, so
brew installusers need no signing action. The requirements above apply only when you redistribute the library inside your own app bundle.
Apple references:
- Notarizing macOS software before distribution
- Customizing the notarization workflow (
notarytool/stapler) - Hardened Runtime
- Disable Library Validation Entitlement
Next Steps
- Configure which metrics to compute
- Run headless without video output
- Migration Guide for upgrading from older SDK versions
Documentation
API reference available at C++ API Reference.
Troubleshooting
Runtime libraries or model files missing
If you see errors about a missing Vulkan loader, MoltenVK driver, or
.tflite model files, run the sample's diagnostic script:
./scripts/check-requirements.sh --fixIt verifies the Homebrew SDK install, repairs the graph asset path, and reinstalls any missing runtime packages.
Metrics do not appear immediately
Keep the subject still and centered in the camera preview until validation reports that recording is OK.
For support: contact support@presagetech.com or submit a GitHub issue.